So, you’ve decided to dive into the world of electrical wiring, huh? Whether you're fixing a faulty outlet or setting up a new home theater system, knowing how to test electrical wires is a crucial skill. But hold up, this isn’t just about flipping switches or turning knobs. Testing electrical wires safely and effectively is all about understanding the basics, using the right tools, and following the proper procedures. In this guide, we’ll walk you through everything you need to know, step by step, so you can tackle your projects with confidence.
Let’s face it, electricity isn’t something to mess around with. One wrong move, and you could end up with a nasty shock—or worse. That’s why learning how to test electrical wires properly is so important. This guide isn’t just for pros; it’s designed for beginners who want to understand the ins and outs of electrical testing without feeling overwhelmed.
By the end of this article, you’ll have a solid grasp of the tools you’ll need, the steps to follow, and the safety precautions that’ll keep you out of harm’s way. Ready to get started? Let’s go!
Read also:Buell Film Video The Ultimate Guide To Elevating Your Cinematic Experience
Why Testing Electrical Wires Matters
Testing electrical wires isn’t just about being thorough—it’s about staying safe. When you’re dealing with live circuits, there’s no room for guesswork. One tiny mistake can lead to serious consequences, from minor shocks to full-blown fires. But don’t freak out just yet! With the right knowledge and tools, you can test electrical wires safely and efficiently.
Here’s the deal: faulty wiring is one of the leading causes of electrical fires in homes. According to the National Fire Protection Association (NFPA), electrical failures or malfunctions were involved in an estimated 44,400 home structure fires in 2018 alone. That’s a scary stat, but it highlights why testing your wires is so important. Regular testing helps you identify potential hazards before they become disasters.
Key Benefits of Testing Electrical Wires
- Prevents electrical hazards like shocks and fires
- Ensures proper functionality of circuits and devices
- Helps diagnose issues before they escalate
- Saves time and money by avoiding costly repairs
Tools You’ll Need to Test Electrical Wires
Before you even think about testing electrical wires, you need to have the right tools on hand. Don’t worry, you don’t need a toolbox full of fancy gadgets. A few key items will get the job done. Here’s what you’ll need:
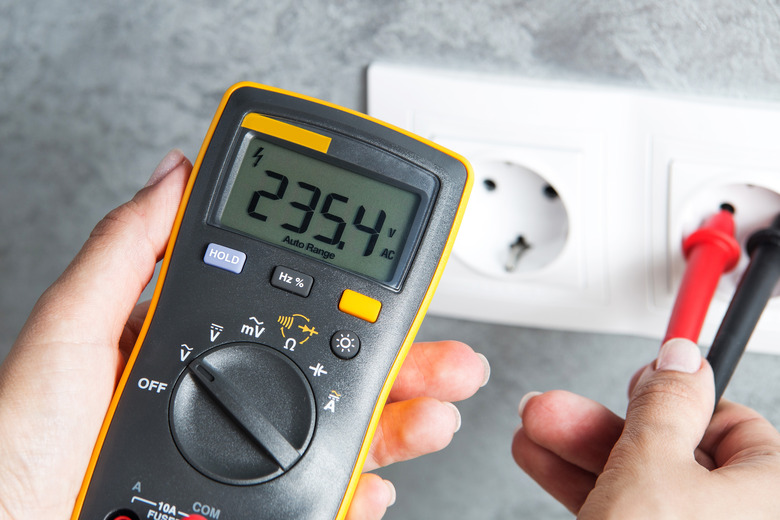
- Voltage Tester: This is your go-to tool for checking if a circuit is live. Voltage testers come in different forms, like non-contact testers or multimeters, but they all serve the same purpose: detecting voltage.
- Multimeter: If you want more detailed information, a multimeter is your best friend. It can measure voltage, current, and resistance, giving you a clearer picture of what’s going on with your wires.
- Insulated Screwdrivers: Always use screwdrivers with insulated handles to avoid accidental shocks.
- Gloves and Safety Glasses: Safety first, folks. Gloves protect your hands from shocks, and safety glasses shield your eyes from sparks or debris.
Now, let’s talk about where to get these tools. You can find them at most hardware stores or online retailers. Just make sure you’re buying from a reputable source to ensure quality.
Understanding the Basics of Electrical Testing
Before you dive into testing, it’s important to understand the basics of electricity. Don’t worry, we’re not going full-on science lecture here. Just a few key concepts to help you make sense of what you’re doing.
What Is Voltage, Anyway?
Voltage is like the pressure that pushes electricity through a circuit. Think of it like water flowing through a pipe. The higher the voltage, the more “pressure” there is, which can increase the risk of shocks or damage. That’s why testing voltage is so important—it lets you know if a circuit is safe to work on.
Read also:Gloria Gaither Health A Journey Of Faith Music And Wellness
Current and Resistance
While we’re on the subject, let’s touch on current and resistance. Current is the flow of electricity, and resistance is anything that opposes that flow. A multimeter can help you measure both, giving you a clearer picture of how your circuit is performing.
Step-by-Step Guide to Testing Electrical Wires
Alright, let’s get down to business. Here’s a step-by-step guide to testing electrical wires safely and effectively.
Step 1: Turn Off the Power
This is the most important step. Always turn off the power at the breaker box before you start testing. Trust me, you don’t want to be messing with live wires. Once the power’s off, double-check by using a non-contact voltage tester to ensure the circuit is truly dead.
Step 2: Gather Your Tools
Make sure you have everything you need within arm’s reach. This includes your voltage tester, multimeter, insulated screwdrivers, gloves, and safety glasses. Being prepared will save you time and hassle later on.
Step 3: Test for Voltage
Using your voltage tester, check the wires to see if there’s any voltage present. If you’re using a non-contact tester, simply wave it near the wires. If it beeps or lights up, there’s still voltage in the circuit. If you’re using a multimeter, set it to the appropriate voltage range and touch the probes to the wires.
Step 4: Check for Continuity
Continuity testing ensures that electricity can flow through the wire uninterrupted. To do this, set your multimeter to the continuity setting and touch the probes to each end of the wire. If the multimeter beeps, the wire is good to go. If not, there might be a break or damage.
Step 5: Inspect for Damage
Take a close look at the wires for any signs of damage, like fraying, burns, or exposed copper. Damaged wires can cause all sorts of problems, so it’s best to replace them if necessary.
Safety Precautions When Testing Electrical Wires
Safety should always be your top priority when working with electricity. Here are a few tips to keep you safe:
- Always wear gloves and safety glasses
- Double-check that the power is off before starting
- Use insulated tools to avoid accidental shocks
- Never touch live wires with your bare hands
Remember, if you’re ever unsure about something, it’s better to call in a professional. Your safety is worth the extra cost.
Common Mistakes to Avoid
Even the best of us make mistakes sometimes. Here are a few common ones to watch out for:
- Forgetting to turn off the power
- Using damaged or faulty tools
- Not wearing proper safety gear
- Skipping steps in the testing process
Trust me, these mistakes can lead to some serious consequences. Take your time and follow each step carefully to avoid any issues.
When to Call a Professional
Let’s be real: not everyone is cut out for electrical work. If you’re dealing with complex circuits or high-voltage systems, it might be time to call in a pro. Here are a few signs that it’s time to seek professional help:
- You’re unsure about the wiring in your home
- You’re dealing with high-voltage systems
- You’ve encountered a problem you can’t solve
Professionals have the training and experience to handle tricky situations safely. Don’t hesitate to reach out if you need help.
Final Thoughts: Take Action Today
Testing electrical wires might seem intimidating at first, but with the right knowledge and tools, it’s totally doable. Remember, safety is key. Always turn off the power, wear proper gear, and follow the steps carefully. By doing so, you’ll not only protect yourself but also ensure that your electrical systems are functioning properly.
So, what are you waiting for? Grab your tools and get started. And don’t forget to share this guide with your friends and family. Knowledge is power, and when it comes to electricity, that couldn’t be more true.
Table of Contents
- Why Testing Electrical Wires Matters
- Tools You’ll Need to Test Electrical Wires
- Understanding the Basics of Electrical Testing
- Step-by-Step Guide to Testing Electrical Wires
- Safety Precautions When Testing Electrical Wires
- Common Mistakes to Avoid
- When to Call a Professional
- Final Thoughts: Take Action Today